STEP 6 - Setting up Agentic AI
6.1 Setup for Agentic AI
- Step 1. Log in to the Azure Portal.
- Step 2. Search for and select Azure OpenAI from the global search bar.
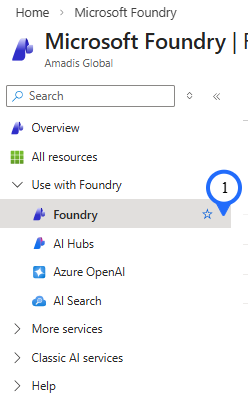
- Step 3. Select Foundry from the left-hand navigation menu.
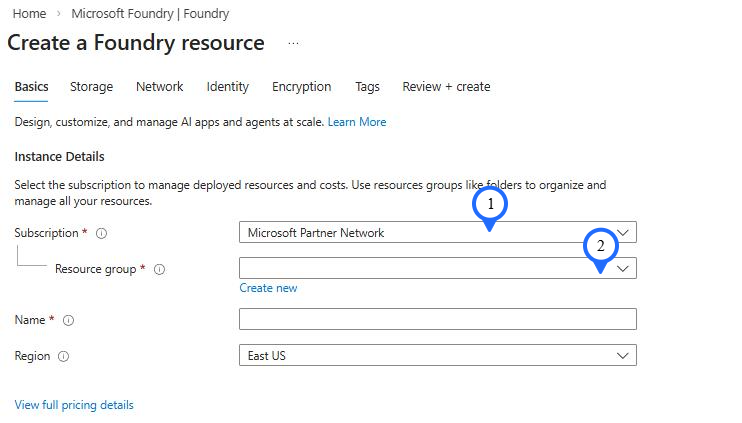
- Step 4. Create a new Foundry resource by selecting your Subscription and Resource Group.
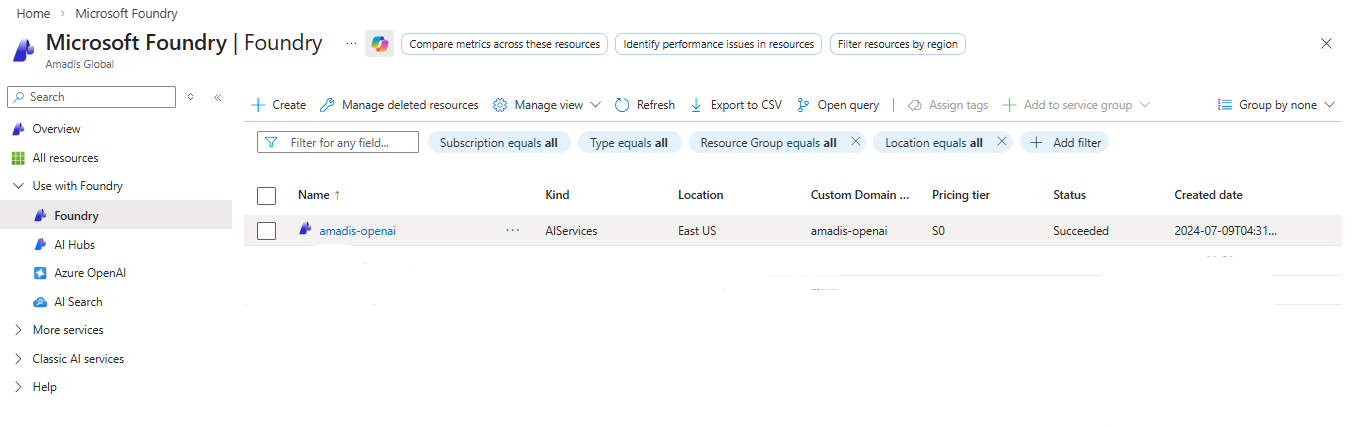
Once created, the resource will be displayed within the Foundry dashboard.
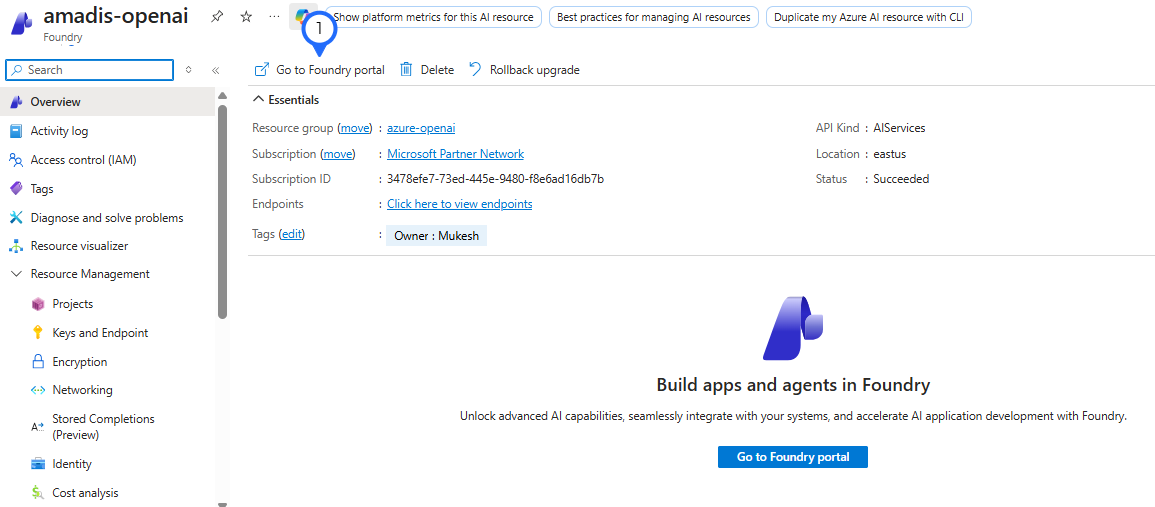
- Step 5. Click the created resource and to enter the Go to Foundry portal.
6.1.2 Deploying a Model in Azure AI Foundry
Once you have entered the Microsoft Foundry portal, follow these steps to deploy your base model:
-
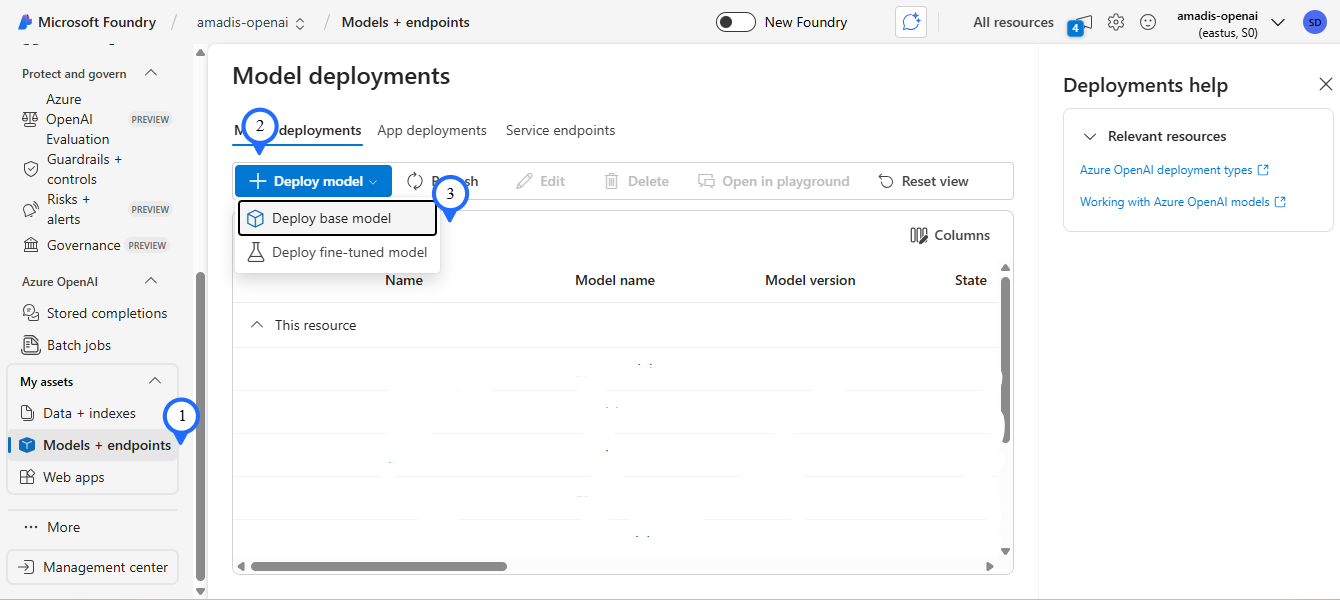
Step 1. From the left-hand navigation menu, locate the My assets section and select Models + endpoints. .
-
Step 2. Click on the + Deploy model button and choose Deploy base model from the dropdown menu.
-
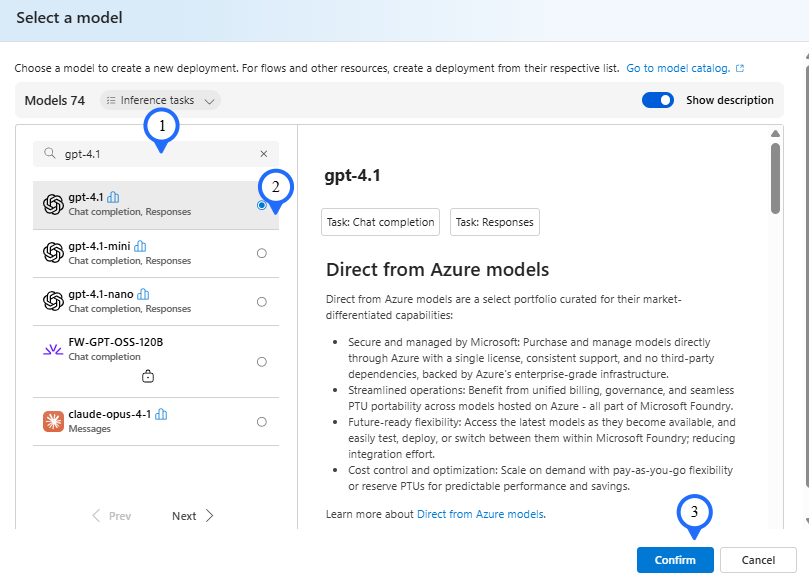
Step 3. In the Select a model window, use the search bar to find gpt-4.1.
-
Step 4. Select gpt-4.1 from the list of available models and click the Confirm button.
Note
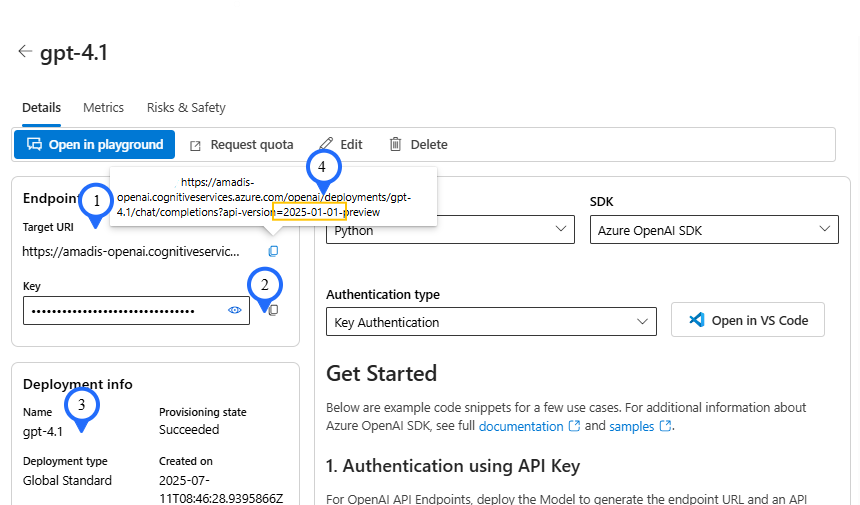
After you confirm the gpt-4.1 setup, stay on the deployment page. You need to copy a few details to connect the model to the cloudcadifinopsagent app service.
- AZURE_OPENAI_ENDPOINT: Copy the full Target URL. This serves as the primary entry point for API requests.
- AZURE_OPENAI_API_KEY: Navigate to the Keys and Endpoint section and copy the key.
- AZURE_OPENAI_DEPLOYMENT_NAME: Copy the exact name from the Deployment info section.
- AZURE_OPENAI_API_VERSION: This is the date-based string at the end of your Target URL (e.g., 2025-01-01).
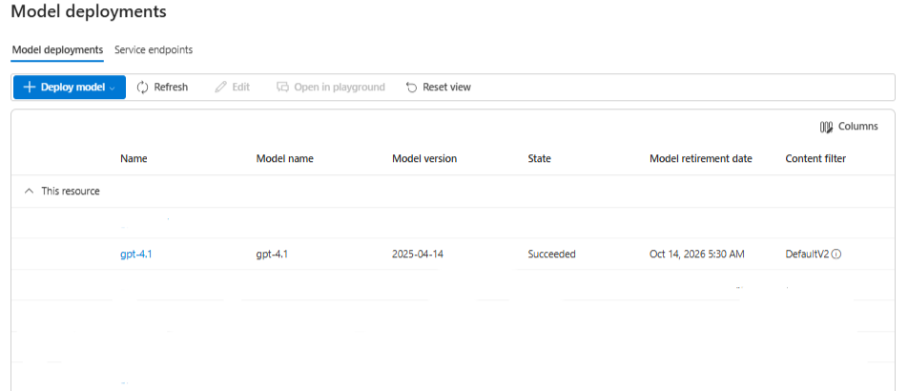
Once confirm the gpt-4.1 setup, the portal will send you back to the Model deployments page.
6.1.3 Deploying the Text Embedding Model
To enable document search and retrieval capabilities (RAG), you must now deploy the embedding model.
-
Step 1. Click the + Deploy model button and select Deploy base model from the options.
-
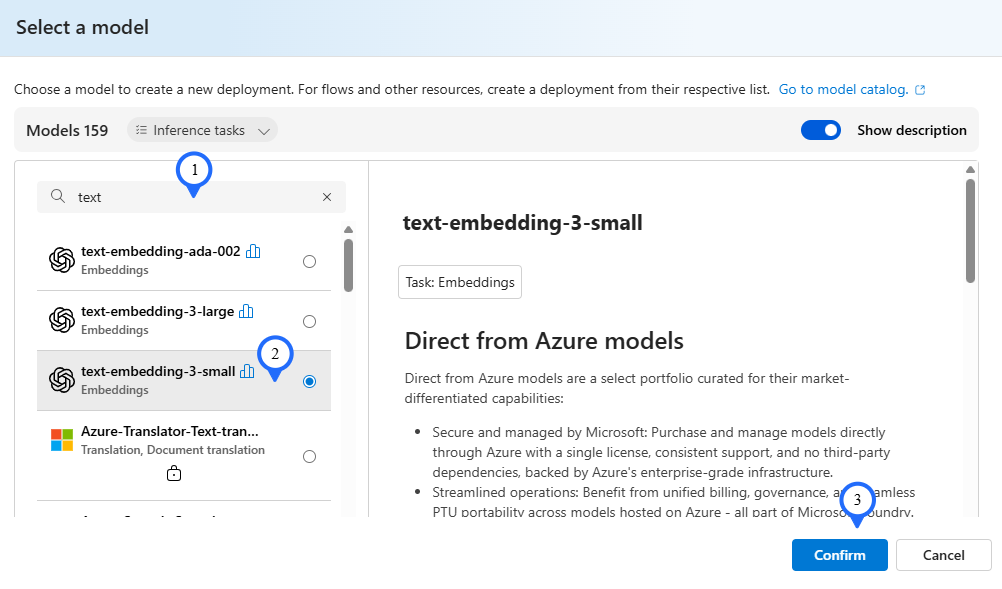
Step 2. In the model catalog search bar, type text-embedding to filter the available models.
-
Step 3. Select text-embedding-3-small and click Confirm.
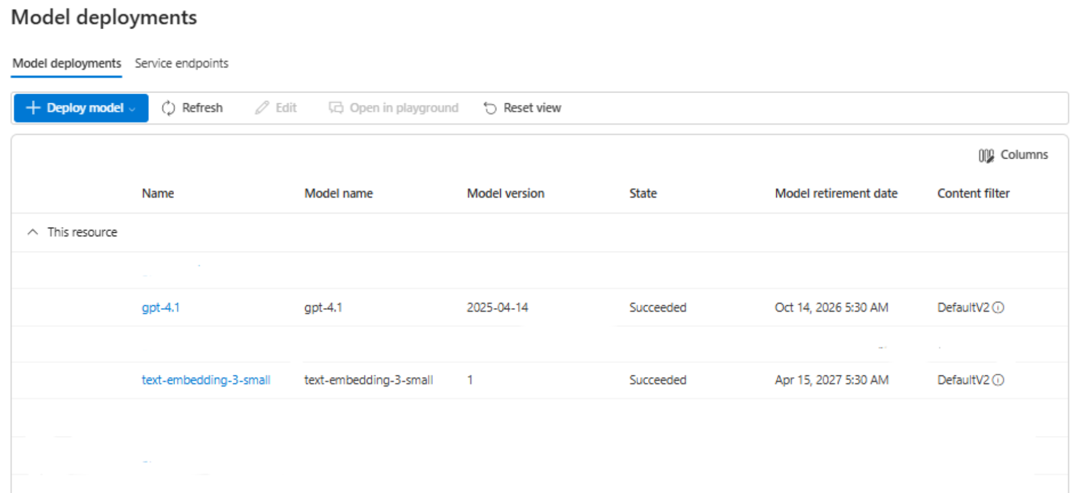
Once the GPT-4.1 and text-embedding-3-small models are confirmed, they will appear on your model deployment page.
Note
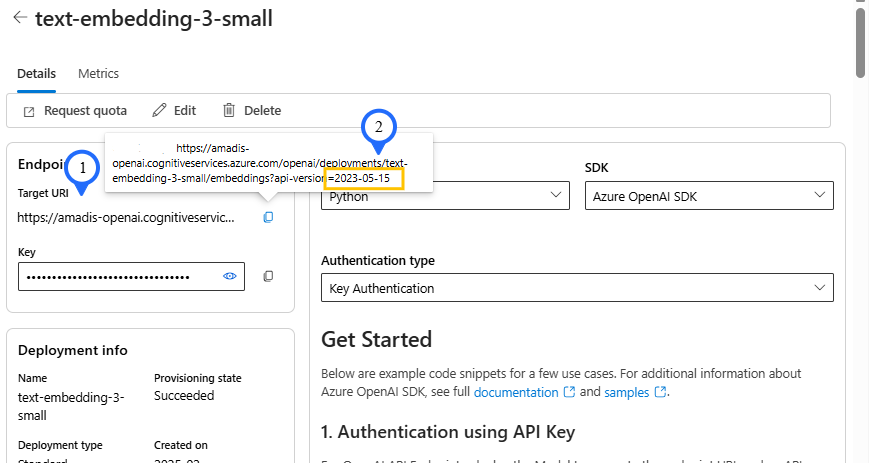
After you confirm the text-embedding-3-small setup, stay on the deployment page. You need to copy a few details to connect the model to the cloudcadifinopsagent app service.
- AZURE_EMBEDDING_ENDPOINT: Copy the full Target URL. This serves as the primary entry point for API requests.
- AZURE_EMBEDDING_API_VERSION: Locate the date-based string at the very end of your Target URL (e.g., 2022-05-15-preview) and save it
6.2 Environmental setup for App Service
The CloudCADI FinOps Agent is a production-ready Agentic AI solution hosted on Azure App Service. To complete the integration, add the API credentials for the gpt-4.1 and text-embedding-3-small models.
Prerequisites
-
gpt-4.1
- AZURE_OPENAI_ENDPOINT
- AZURE_OPENAI_API_KEY
- AZURE_OPENAI_DEPLOYMENT_NAME
- AZURE_OPENAI_API_VERSION
-
text-embedding-3-small
- AZURE_EMBEDDING_ENDPOINT
- AZURE_EMBEDDING_API_VERSION
Steps for App Service:
- Log in to the Azure portal.
- In the Global Search Bar at the top of the portal, type "App Services" and select it.
- From the list, select cloudcadifinopsagent App Service.
Setting Section
- Click on the Environment variables tab which is under the settings section.
- Under the App Settings add the details below.
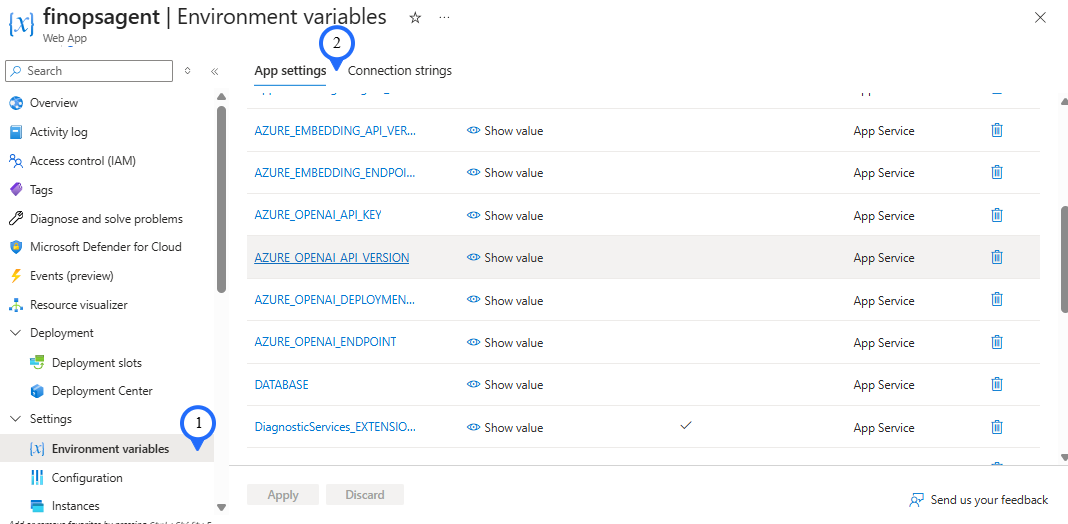
- Click on AZURE_OPENAI_ENDPOINT
- In the Value field, paste the Azure OpenAI URL you copied earlier.
- Click on Apply
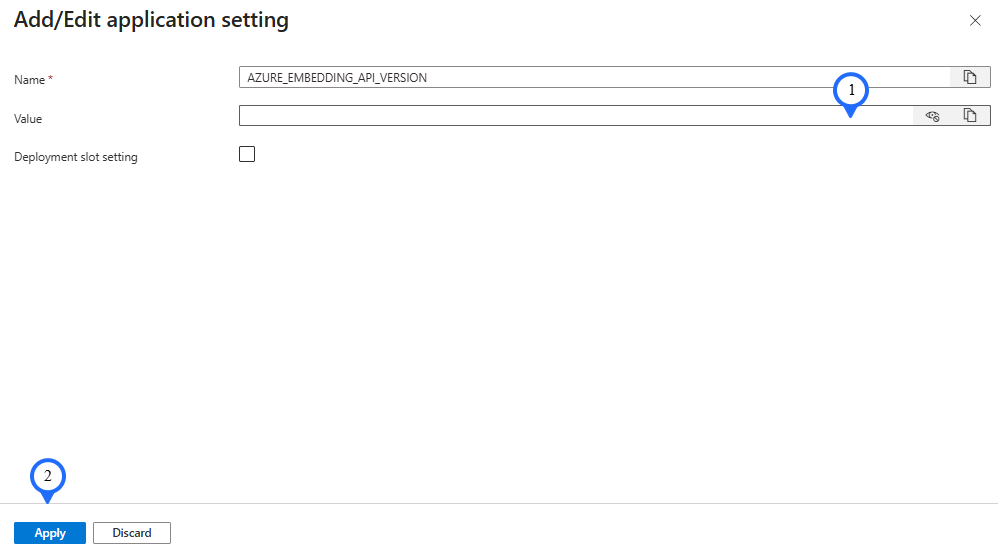
Repeat the Add/Edit process for the following.
GPT-4.1 Model
- AZURE_OPENAI_API_KEY
- AZURE_OPENAI_DEPLOYMENT_NAME
- AZURE_OPENAI_API_VERSION
Text-Embedding-3-Small Model
- AZURE_EMBEDDING_ENDPOINT
- AZURE_EMBEDDING_API_VERSION
Once all six variables are updated, click Apply at the bottom of the page.